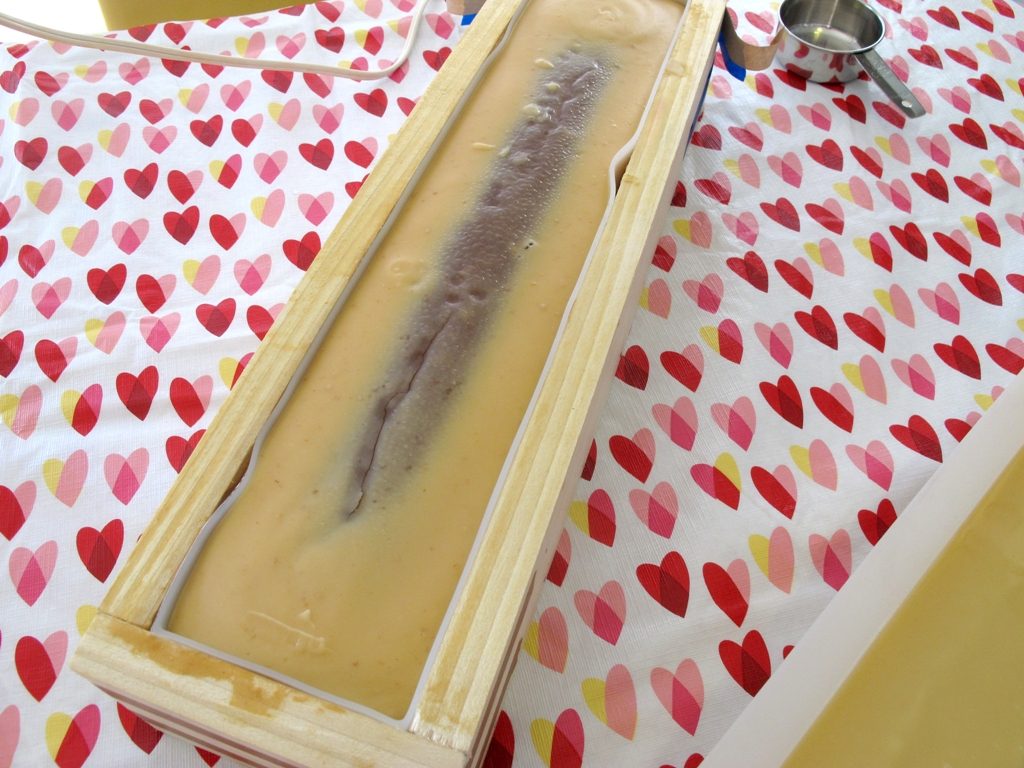
The gel phase of soap making is the heating stage of saponification. Once you pour your soap into its mold it will start to heat up. Gel phase starts with the soap turning translucent in the middle and then spreads out to the edges.
Check out this goat’s milk soap that is just starting gel phase.
More gel phase.
If your mold is not insulated or not able to hold heat then your soap might not gel. No worries, soap does not have to gel in order to turn out properly.
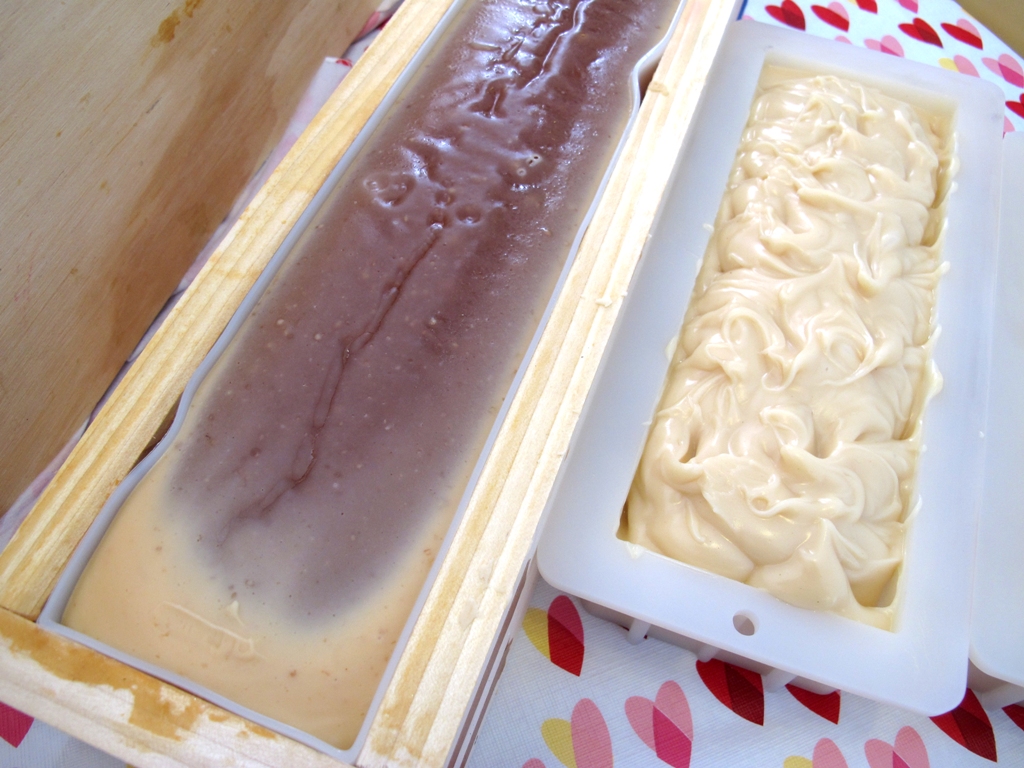
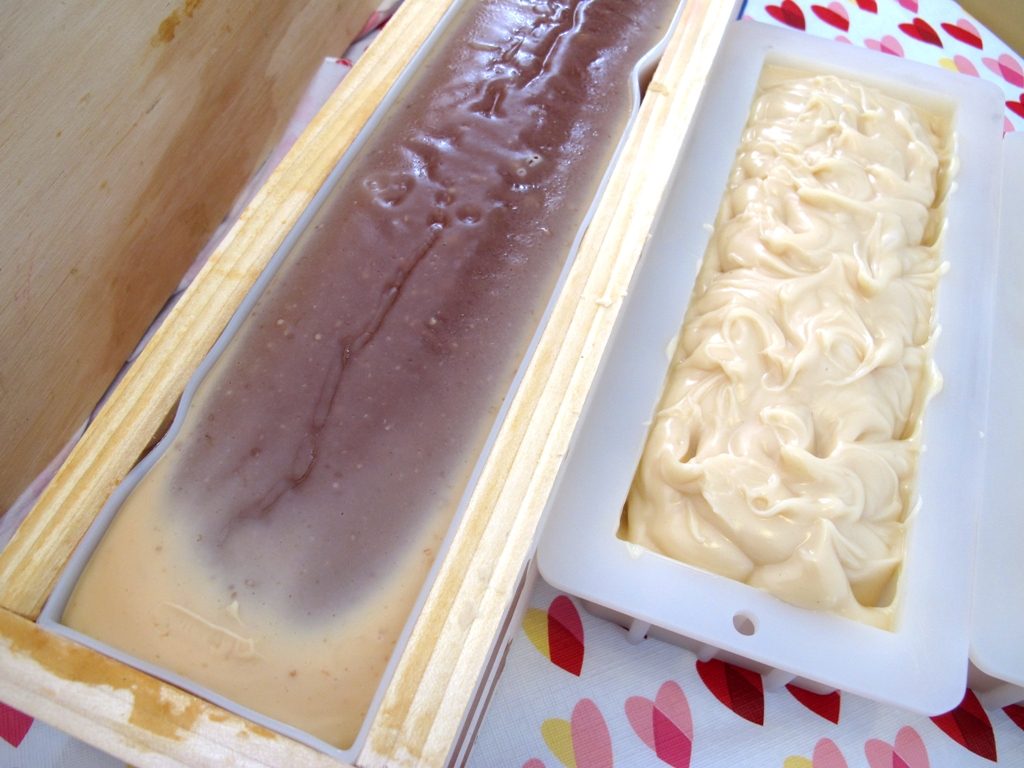
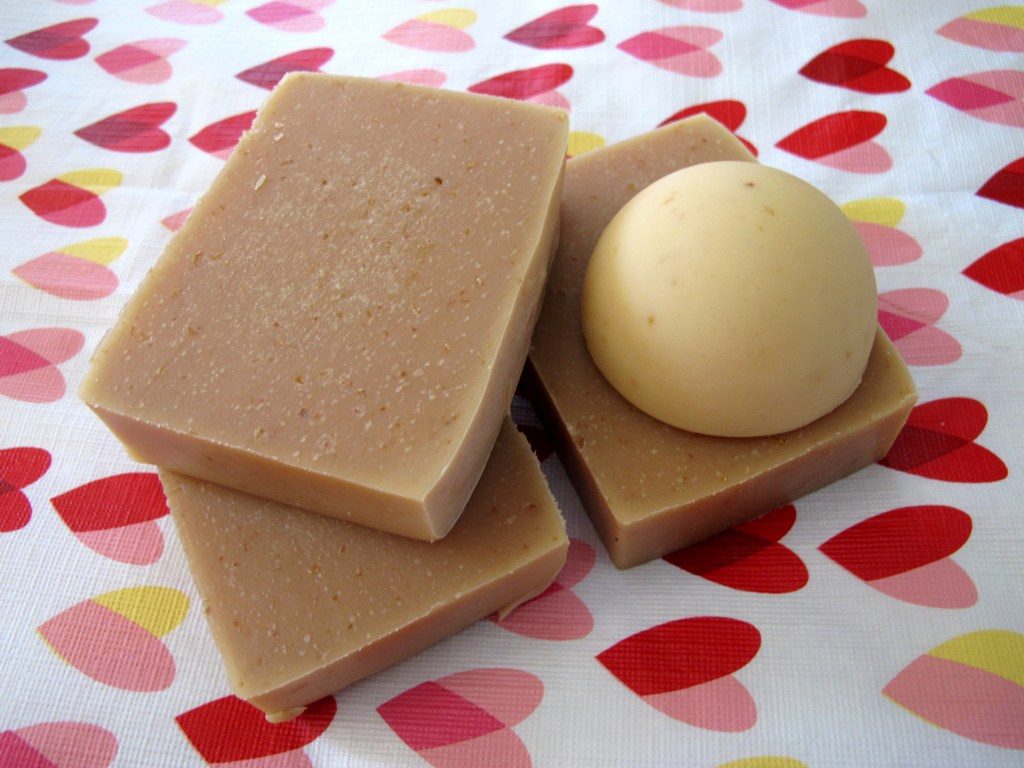
The biggest difference between gelled and un-gelled soap is the color of it. Colors can sometimes appear darker in gelled soap. Check out this soap. The darker color went through gel phase in a log mold and the lighter round soap (from same batch) did not go through gel phase. What a different in color!
Un-gelled soap can also take longer to harden enough to remove it from the mold.
Please note that some fragrances, especially floral type scents, honey and other additives, can heat your soap up. It can sometimes be impossible to prevent gel. Many soap makers choose to try and prevent gel when soaping with milk, as milk soap heats up and can overheat causing cracks and other issues.
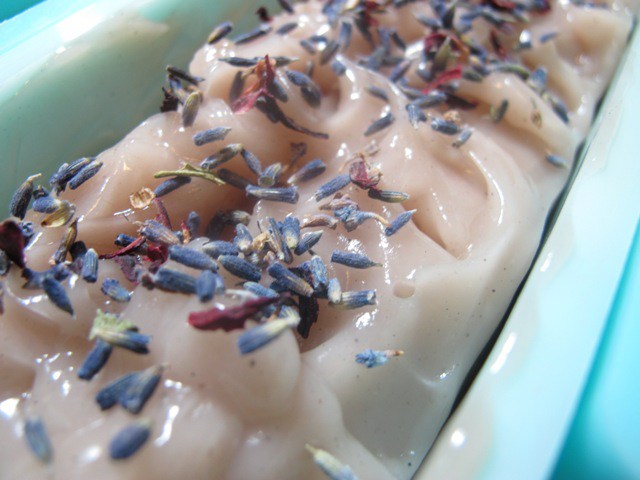
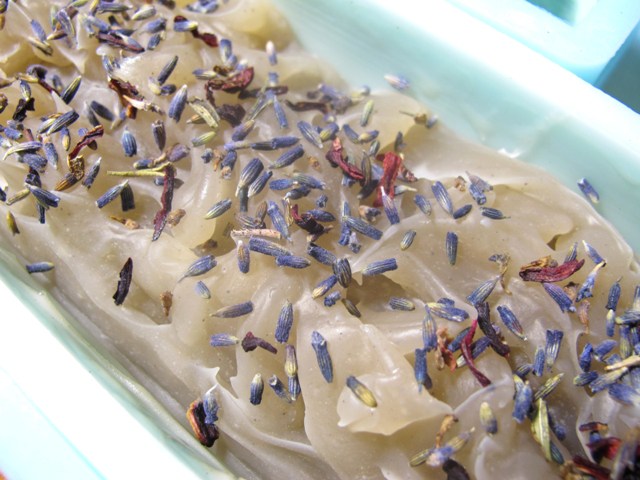
Below is a lavender soap that I just poured into the mold. Below it is the same soap going through gel phase. Gel phase is really dark in some soaps, but in this one, it wasn’t that dark, but you can see the difference in translucency.]
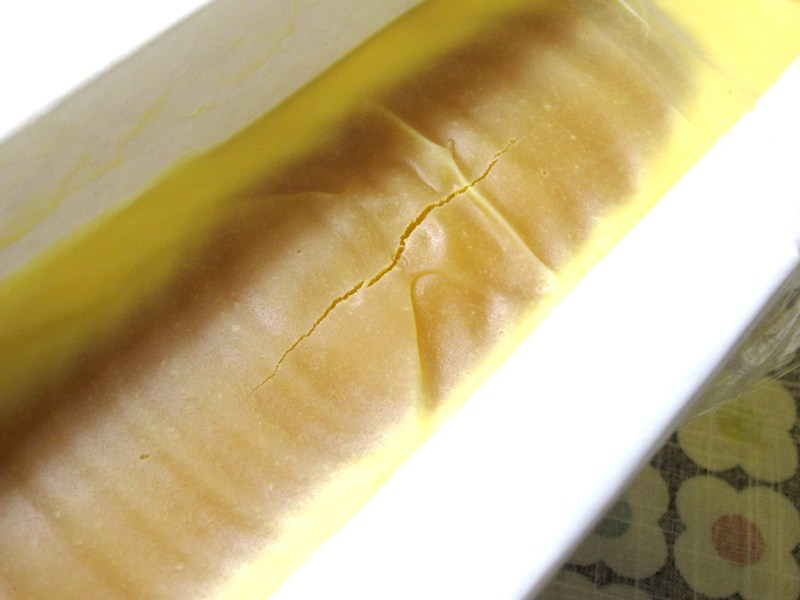
The soap below is going through gel phase and is getting so hot that it is cracking. Soap cracks when it is trying to release the high heat inside.
If you see your soap cracking, try to cool it down. You can put it in the fridge or freezer, or you can simply elevate it onto a cookie rack (or something similar) and shoot a fan at it. If it is cold where you live, simply put it outside.
Sometimes it can be alarming to see your soap going through gel phase. Now you know what is going on.
Partial Gel in Soap
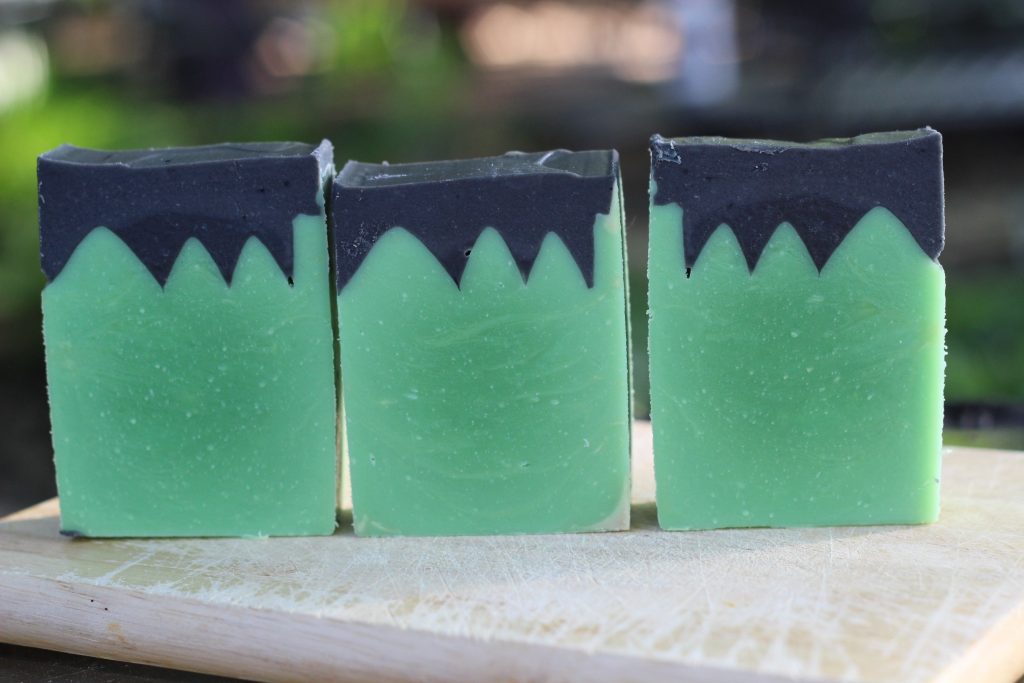
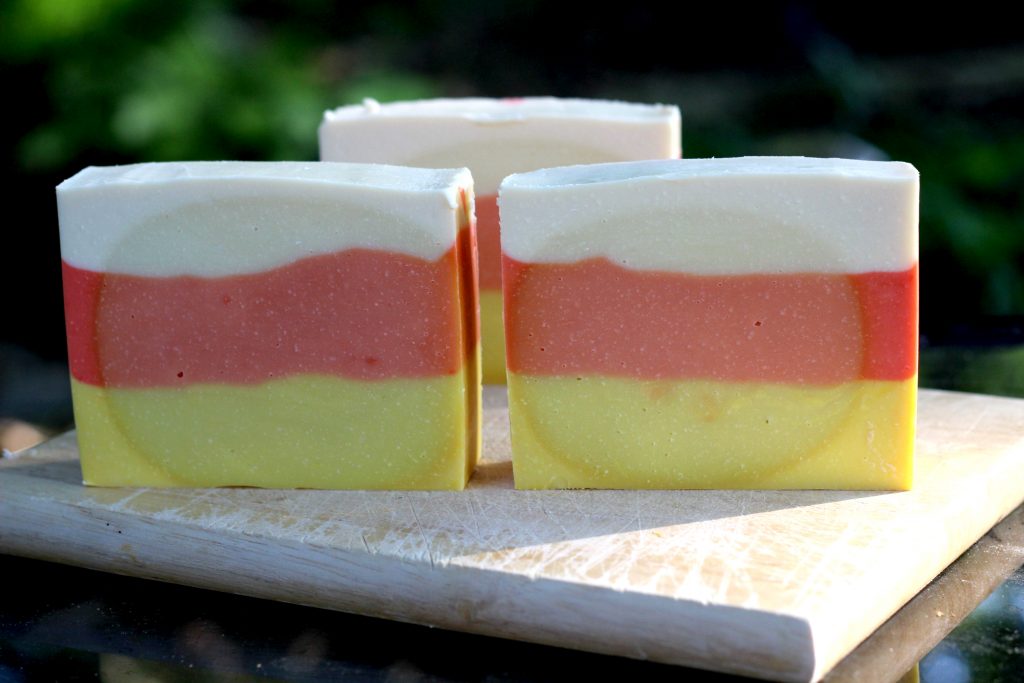
Soap can partially go through gel phase. You’ll know that this happened when you cut your soap and there is a dark circle in the center. This is simply an aesthetics issue; your soap is perfectly find to use. Here are some examples of partial gel.
Take a close look at my Frankenstein soap. The partial gel is very light, but you can see the darker center.
And another soap, my candy corn soap, has a partial gel. Check out how it affects the colors! The good news is that after a bit of time, the colors evened out.
To prevent a partial gel in soap, you can prevent your soap from gelling or force it all the way through the process. See below.
Preventing Gel Phase in Soap Making
Sometimes soap makers want to prevent their soap from going through gel phase. I know many soapers who prevent their milk soaps from gelling because they want them to look nice and light in color. Here are some things you can try to prevent gel.
- Discount your water. To understand why, check out Kevin Dunn’s book, Scientific Soapmaking. Use a water discount to prevent gel. I personally use water at two times my lye and my soap hardly goes through gel phase unless I force it using some techniques below.
- Make smaller batches. If there is a smaller mass of soap, it can’t hold heat in as well. Slab molds are great for preventing gel because the soap mass is spread out with lots of surface area for heat to leave.
- Put your soap in the fridge or freezer. I know many soapmakers who make a loaf of soap and stick right into the fridge or freezer.
- Elevate your soap after you pour it. Use a cookie rack or something similar to provide airflow around your mold. You can even aim a fan at it to keep it cool.
- When your pouring multiple loafs, don’t line them up together touching. Let plenty of air circulate around each mold.
- Soap at cooler temperatures. Aim for temps of 80-90 degrees F for both your lye solution and oils.
Forcing Gel Phase in Soap Making
There are many times in soap making that you will actually want to force your soap through gel phase. It might be because you are tired of partial gel, or it might be that you are soaping with natural colorants so you want to force gel to get vibrant colors.
Here are some tips for forcing gel phase.
- Soap warmer. Make your soap with your oils and lye at warmer temps. If you currently soap at room temp or 80-90 degree F, try soaping at 100-110 degree F. Now remember, higher temps can make your soap speed up! So if you are trying to swirl and do more intricate designs, then try another technique below.
- Use more water. It can be hard to gel soap with a water discount. To understand why, check out Kevin Dunn’s book, Scientific Soapmaking. Use more water to help force gel.
- Cover your soap with wood or a cardboard box to hold the heat in.
- Set your soap on a heating pad to force gel. Combine this with covering your soap with wood or a cardboard box and you’ll be creating heat and making sure that it stays in the soap.
- Use your oven to force gel. Many soapmakers use a process called cold processes oven process (CPOP) to force their soap to gel in the oven. I’ve used it quite a lot. Here is how I do it.
- I turn my oven on to warm (your want it to be about 170-180 degrees F.
- I made my soap as usual.
- I turn my oven off and put my soap inside the warm oven and leave it over night.
Some soapmakers leave their oven on warm. If you do that, just keep a close eye on your soap. Once you see it complete gel phase you can remove it and let it cool down.
Keep an eye on your soap if you CPOP. If you’re soaping with spices, florals, sugars (including honey), milk and alcohol, all of these additives can help to heat up your soap. You don’t want your soap getting to hot in the oven and then cracking or volcano-ing out of the mold.
To gel or not to gel is simply a matter of preference! Don’t be afraid to experiment!
Happy Soaping!
-Amanda Gail


Hello! I’ve just made my first batch of cold process soap, and wrapped it in a towel in a warmish room to force it to gel phase. How long do I leave it wrapped in the towel; how long does it take gel phase to “finish” I guess is the word?
This is really kinda fun and I hope to do more of it!
Thank you!
Kim Klein
Thank you for this clear explanation. I am in several forums and people are so dead set on gel or not gel. if anyone does it different than they do they say its ruined. throw it out. I was getting so confused. This makes things crystal clear. I make goat milk soap and while I love the creamy tan color, I would like to try and avoid gel and place it in the fridge next batch.
informative article, I didn’t know much about soap-making and the forcing gel phase. Your post is well written and it helps me to understand this soap-making process with preventing the forcing gel phase.
The gel phase really confuses me. I read a post that said making gel soap and keeping it in that phase is better for looks, but now it seems like it won’t be as stable or usable. I like the effect you got on the Frankenstein soap though with the dark circle.
I have now made four loaves. the last three the same recipe. All three went through partial gel. One I did CPOP and the other two I left out. I covered two of them with saran wrap and a towel. The last one I covered with a board but didn’t wrap it. I mixed two of them around 95-100 degrees and one at 90-95 degrees. They keep doing the same thing. All three partial gel in center. I am about ready to give up this is nuts! Help?
How long do you leave it in freezer or refridge to cool down? To stop the gelling?
I just made 2 5lb loaf molds and they are almost completely gelled except for the sides are lighter in color. I usually take my soap out of the mold after 24 hours and cut it but it seems as though I should wait longer with these ones because it almost doesn’t look “completed” yet. Should one wait longer before cutting when its gelled? Thanks for all the great tips 🙂
My first batch of soap did not gel, the second did (and the top came out raggedy looking as a result). My third batch almost turned into a volcano! Now I know why…each time I worked at higher temperatures. On the third batch, I mixed in the lye at about 180 degrees F.
Thanks for the info!
Great article, just wish that all temps , measures would have both degrees F and C, save us trying to work it out all the time. Same as weights and liquids.
We live and learn.
Hi! This blog is so insightful! 🙂 Question though, is it safe to put cold process soap in the fridge together with food? Or is there any risk of contamination? Thank you!
Fid
hi Amanda – i bought your book on soaping – i love the recipes – really nice to work with – but – no matter what i do when i make your basic body bar – i get partial gel phase – it doesn’t improve as the soap cures – can you please give me some suggestions on what to do – can you also tell me the temp you mix your lye/water solution into the oils – i have tried from 38 degs C down to 33 degs C – the one i made at 33 degs C had the worst partial gel phase – i am scratching my head trying to work out what to do – i have tried insulating – double insulating and putting the soap mold into the coldest room in my house – its a long mold that wont fit in the fridge – it was made for me so i only need the one mold with various sizes on it – its a great mold and its wood and i line it with freezer paper – should i try the freezer theory and if so how long should i put it in the freezer??? – i am hoping you can help me and i look forward to yours or someone else’s answer to get me over this huge bump in my soaping road
my soap almost always have parciel gel driving me crazy lol
I learn so much from your blog Amanda. Thanks for having one!
Thank you Amanda, I love this post. I noticed this happening with my soaps, as I have made goat milk soap for about 6 years now. The science of the gelling stage was never explained to me until now!
Miranda: Have you tried putting your soap mold onto a cookie sheet or plastic cutting board and tapping it up and down? This releases some of the air bubbles trapped in your hot soap right after you pour it.
Merrilyn: These soaps have natural glycerin in them and they tend to absorb water. It is best to keep them elevated so they don’t sit in a pool of water. This also will make the soaps last a bit longer.
I have noticed every time I force gel in the oven my soap gets bubble pockets all over the interior edges of the mold. What am I doing to cause this? I put my soap(with and without coconut milk) in silicon molds and put it in a warm oven and leave the door closed till it fully gels, then open the door and let it cool down for the night. I pop out the soap and there are little air pockets all over the detailed sides of my soap. Please help, I thought I was just letting it get to hot and maybe bubbling a bit in the mold? but I cant find anything on it. My oven is normally 160-190 when I turn it off to put my soap in.
Great advice. We always try to promote gel phase when using colors, and try to prevent it when using milk or cream based soaps. We put it in the fridge to prevent gel phase, and wrap it in a blanket to promote it.
Hi Amanda, just getting into soapmaking and have been reading your post for a while now . I’m so glad you have done all this reasearch for me as I will trust your results and follow the receipts you have for us. Again thank you so much .keep posting looking forward to your next video.
Hi, I love making soap, but I am finding when I use it, it stays soft and mushy. If I put it on a wire soap holder it will go back to being fine, but if I don’t it is all gluggy. Any hints?